Harvesting and reusing yeast is a simple and cost-effective technique that homebrewers can brew like a pro. Specialty brewers often harvest and reuse (recondition) yeast, taking advantage of a fresh, healthy, plentiful supply of yeast from previous batches. Reusing yeast can save you some money, with the added advantage that you can start the next batch with a larger batch.
How to Harvest Yeast
Reusing the yeast begins by pouring the beer into kegs or bottling barrels, and then removing the yeast from the fermenter. It’s best to prepare for harvest the night before, but at least four hours before you’re ready to pack the beer.
Collecting, storing and re-inoculating yeast between batches is uncomplicated. It takes a little planning and a lot of attention to hygiene. Every container, spoon, funnel, tube, or other tool that comes into contact with the yeast you plan to re-add must be clean and sanitized before use. Clean means no dirt or other unwanted residue clinging to your device. Sanitizing means killing any unwanted microorganisms in or on equipment.

How to Clean Yeast
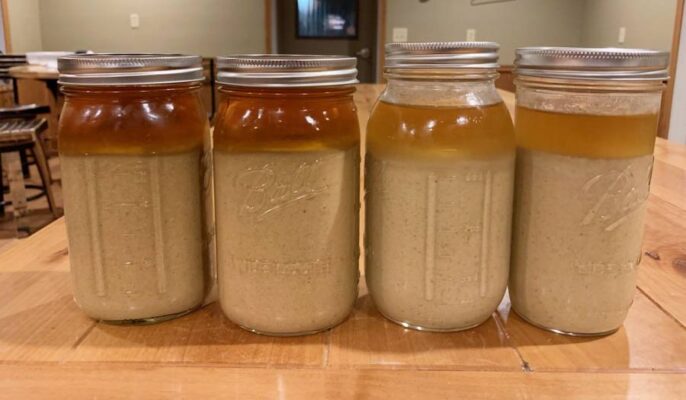
After collecting the remaining yeast (and residue) in a container, place it in the refrigerator for at least four hours. This will allow the different layers in the solution to be resolved. Throughout the process, you’ll work with three different layers:
- Bottom: dark gray or green, these are the remains of the wort, including dead yeast cells, spent grain, precipitated protein and hop residue. In general, you will need very little of these substances in the final liquid yeast that you store and reuse.
- Middle: Yeast. This is where you should have healthy, creamy yeast. Healthy yeast is creamy in color and smells like bread. It should not have a severe odor or aroma. It is this middle layer that we want to harvest and reuse.
- Top: This thin layer may be clear, beer colored, or grayish. It contains more dead yeast cells, water, beer and alcohol. You also want as little as possible to remain in the final product, although it will occur in stored yeast and may need to be poured out from time to time, depending on how long you plan to store liquid yeast.
Now that the rest is well refrigerated, it’s time to start cleaning the yeast. Proceed as follows:
- Boil enough brewing water to fill your carafe (boiling time: 10-15 minutes)
- In another container, boil the glass jar and lid for 10-15 minutes to sterilize it
- Now, cool down the brewing water to match the temperature of the remaining yeast (i.e. around 4 degrees Celsius)
- After the water has cooled, fill the glass bottle about halfway with the remaining yeast and add the chilled brewing water
- Keep doing this until all glass jars are full or the remaining yeast is used up. Don’t be greedy! Once the leftovers reach the dark liquor, stop pouring!
- Now, seal your mason jars and swirl each mason jar well for a minute or two to mix the water and remaining yeast. Be gentle and make sure they are mixed
- Return the mason jar to the refrigerator and let it sit for at least 40 minutes (2-3 hours is better though).

Advantages of Reusing Yeast
More Yeast Styles
There is no problem with using dry yeast. It’s reliable, easy to store, easy to use and has a long shelf life. Of course, it also helps you brew amazing beer. But, we’re living in a golden age of beer brewing now, and we have access to a vast array of yeast strains, and the selection grows every year. As more and more brewers turn to wild yeast, the possibilities for beer flavors seem endless. Most of these yeasts are reusable yeasts that will help you achieve more yeast styles. Too, many yeast strains will exhibit higher fermentation performance, flocculation and enhanced production of flavor compounds upon repeated use.
Save costs
Reusing yeast offers possible benefits to brewers and owners. The most obvious reason to reuse yeast is to lower the cost per brew. You can apply brewer’s yeast from your previous brew to your next batch of beer.
Get better fermentation results
If the same beer needs to be brewed two or three times in a row, repeat yeast will usually provide better fermentation in the second batch.
Storage of Reusable Yeast
Collected yeast is best reused immediately. Any form of yeast storage will result in reduced yeast performance. Yeast is destroyed. When using a fermenter for fermentation, how to preserve yeast is a very complicated issue. Washing and preserving yeast in water is not good for yeast from a biological point of view. Because of the loss of auxin, it will damage the yeast, resulting in a decrease in the ability of the yeast to use maltose. Yeasts with a tendency to mutate must be replaced by a new generation of cultured yeast. The temperature of the yeast should always be lower than the temperature of the inoculated wort to activate the yeast during the inoculation process.


